The online world is constantly evolving, and with it, the threats to your organization’s data. Securing your Microsoft 365 environment requires a multi-layered approach, but strong passwords remain the first line of defense . For IT admins, managing these passwords effectively walks a tightrope between robust security and user convenience. Amid these challenges, it’s crucial to address the fundamental question:
Do Passwords for Office 365 Expire?
A common question among Office 365 users is, “Do passwords expire ?” The short answer is yes, and it depends on your organization’s settings. By default, passwords are set to never expire, which Microsoft recommends. This approach aims to reduce the burden on users and prevent the risks associated with frequent password changes, such as choosing weaker or reused passwords.
Whether to set passwords to not expire or to set an expiry date for passwords has long been debated. Despite Microsoft’s recommendation, many organizations still opt to set password expiration policies.
- This decision is often driven by regulatory requirements, internal security policies, or a traditional belief that regular password changes enhance security.
If your organization decides to set expiration dates, it is crucial to establish a system for tracking & reminding users about their upcoming password expirations. Automating this process can save time and reduce the risk of forgotten password changes.
In this blog, we will explore how to send email notifications to users before the password expires using Power Automate. While PowerShell is also available for this task, Power Automate is preferred for more customizations.
For more workflows on Microsoft 365 user onboarding & offboarding, refer our AdminDroid GitHub.
How to Set Password Expiration Policy in Microsoft 365?
Microsoft has pre-configured essential Azure AD password policies for secure implementation. However, admins can customize these settings to further strengthen organizational security. You can set expiration dates with these simple steps:
- Go to the M365 admin center.
- Navigate to Settings -> Org settings.
- Under the ‘Security & privacy’ tab, locate ‘Password expiration policy’.
- Uncheck ‘Set passwords to never expire’ and enter your desired value in the box.
- You need to enter values between 14 and 730.
- Then Save.
Once the password expiration policy is set, it’s the admin’s responsibility to ensure users are notified about upcoming expirations. This can be efficiently managed by creating a flow for password expiration reminders using Power Automate. For a user-friendly view of expiration details, use the Powershell script to track password expirations.
Send Password Expiration Notification Using Power Automate
Here’s a step-by-step guide to create a Power Automate flow that sends daily password expiration notifications starting 7 days before the password expires:
License Requirements:
Since the HTTP action within the flow requires a premium license, you’ll need a Power Automate Premium license to run this flow without any errors or warnings. You can sign up for a 90-day free trial to test this functionality.
Automated Password Expiry Notifications Workflow – An Overview
Here’s how the flow works:
- Creates a recurring task to check password expiration.
- Retrieves users’ password status from Microsoft Graph API.
- Checks if a user’s password will expire within the next 7 days.
- Sends an email to users reminding them to update their passwords.
- If a user updates their password within this 7-day period, reminders will pause until their next password expiration date.
You have two methods to integrate the flow into your environment. Choose the one that best suits your requirements.
1. Deploying Password Expiration Notification Flow Directly from a ZIP File
2. Creating Password Expiration Notification Flow – A Step-by-Step Guide
Option 1: Deploying Password Expiration Notification Flow Directly from a ZIP File
If you prefer not to build the flow from scratch, we’ve simplified the process for you. Just import our pre-built package into your Power Automate environment and effortlessly run the workflow. Follow these steps to get started:
1. Importing the Flow:
Download the PasswordExpirationNotificationEmail.zip
- In Power Automate, go to My Flows and click Import.
- Upload the ZIP file, modify the flow name as needed, and select Select during import.
- Authorize connections using your Office 365 account.
2. Modifying the Flow:
After importing successfully, make these necessary modifications:
- Within the HTTP action, add your access token value.
- In the ‘Send an email (V2)’ action, enter email subject and body.
3. Enabling the Flow:
- Once modifications are complete, ensure the flow is turned on to initiate automated processes.
Option 2: Creating Password Expiration Notification Flow – A Step-by-Step Guide
If you prefer to create the flow manually, you can follow the below procedures. The flow includes,
- Create a scheduled cloud flow
- Configure recurrence action
- Add HTTP action
- Parse JSON response
- Add condition to check password expiration
- Send password expiration notification email
- Save the flow
Step 1: Create a Scheduled Cloud Flow
- Open Power Automate and click on ‘Create’ from the left navigation.
- Under ‘Start from blank’, choose Scheduled cloud flow. A scheduled flow will allow you to run the process at specified intervals.

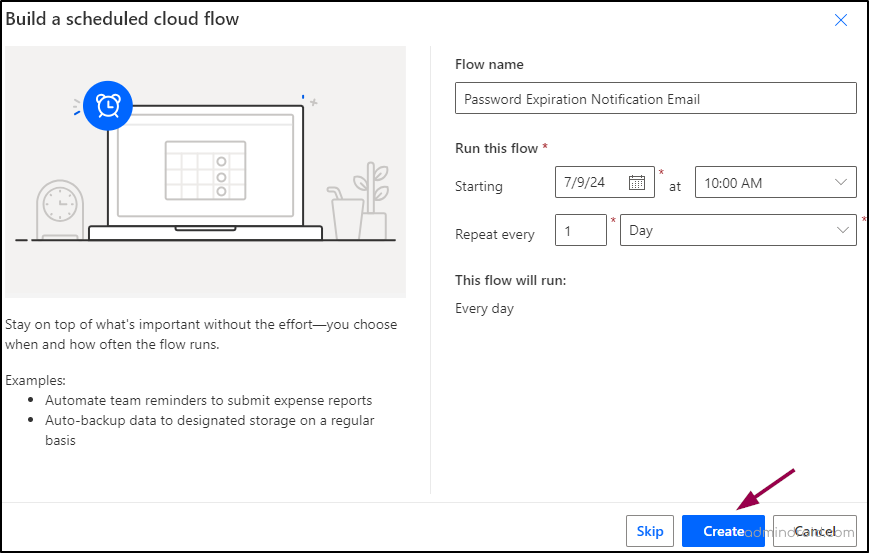
Step 2: Configure Recurrence Action
- Give your flow a name.
- Adjust the recurrence for your flow by setting the starting date, time, and recurrence. It is suggested to set to ‘repeat every day’. Click on Create. This ensures the flow runs daily to check for upcoming password expirations.
The first action for your flow Recurrence is now created. The next step is to add an HTTP action to fetch user data from Microsoft Graph API.
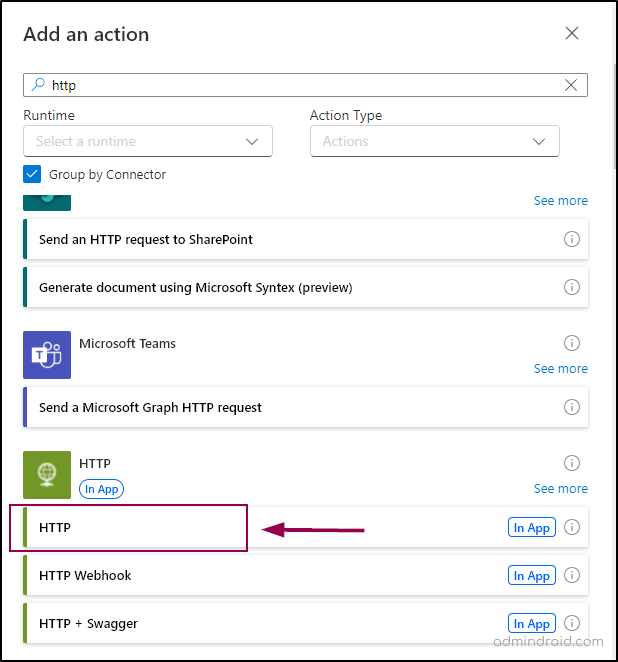
Step 3: Add HTTP Action
- To add the next action for your flow, click on the + button below Recurrence.
- Select Add an action. Search for HTTP in the search box and select HTTP.
The HTTP action allows you to make a request to an external API, in this case, Microsoft Graph, to fetch user data.
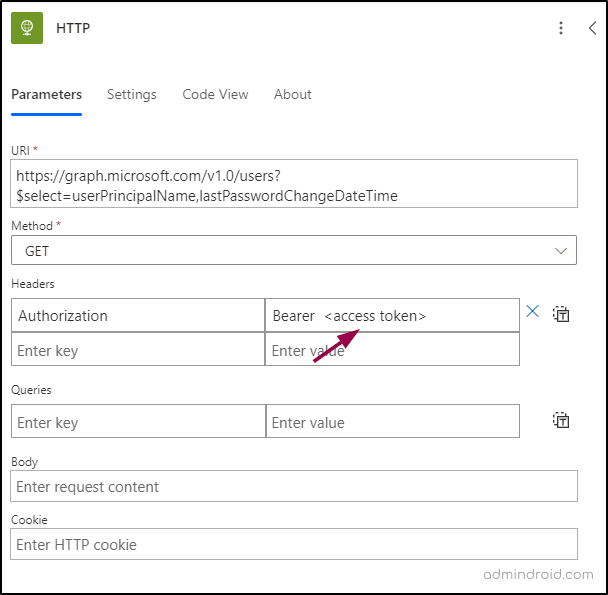
Enter the following within the fields:
- URL:
https://graph.microsoft.com/v1.0/users$select=userPrincipalName,lastPasswordChangeDateTime- Method: GET
- Headers:
- Key: Authorization
- Value: Bearer <access token>
Replace <access token> with your access token. For example, Bearer eyJ0eXAi……
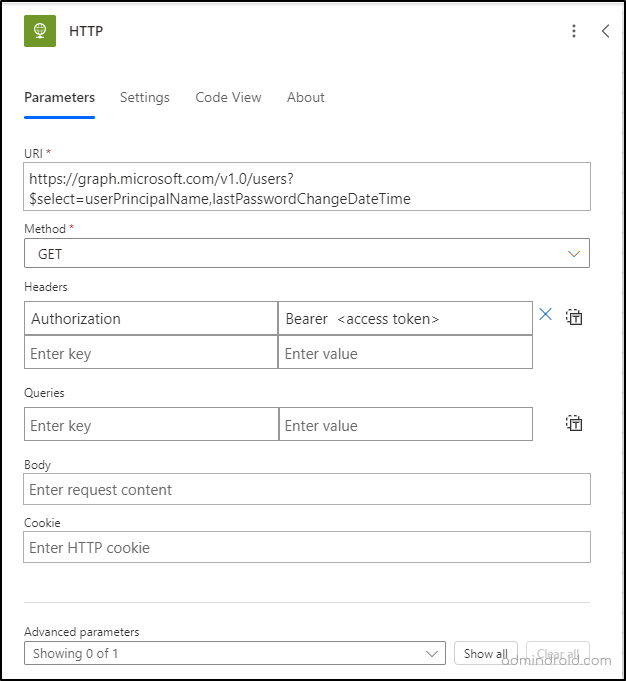
Note: An access token is necessary to authenticate the API request to Microsoft Graph. To generate an access token, first, register an app with Azure AD, add the necessary permissions (User.Read.All), and then use the credentials to generate one.
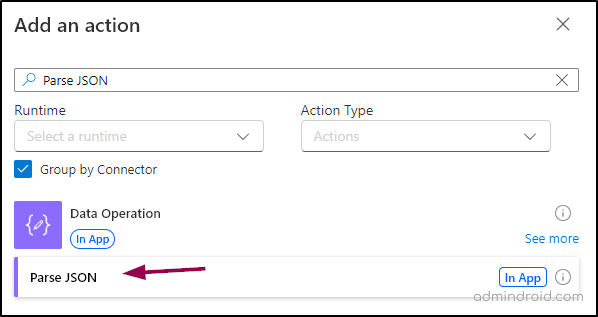
Step 4: Parse JSON Response
Parsing JSON allows you to easily handle the data returned from the HTTP request. For that,
- Add an action and search for ‘Parse JSON’.
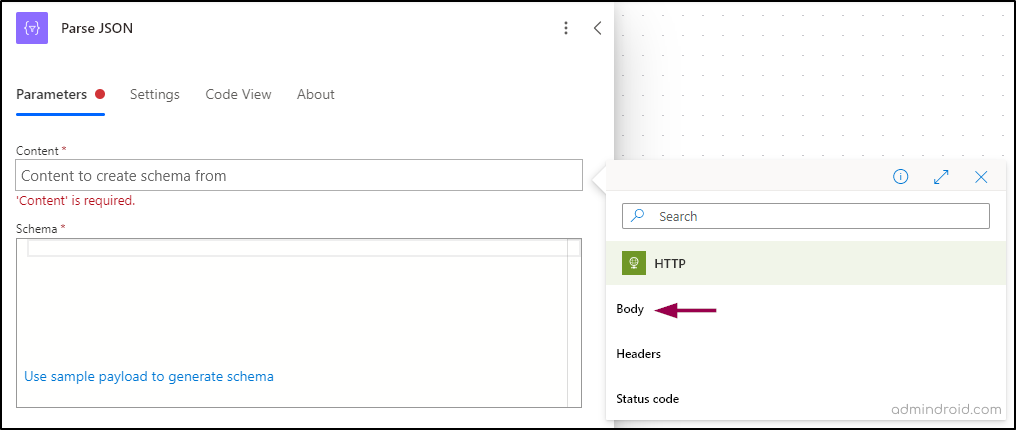
- In the ‘Content’ field, click on the dynamic content icon. It allows you to insert dynamic content from previous steps in your flow.
- Select ‘Body’ under ‘HTTP’.
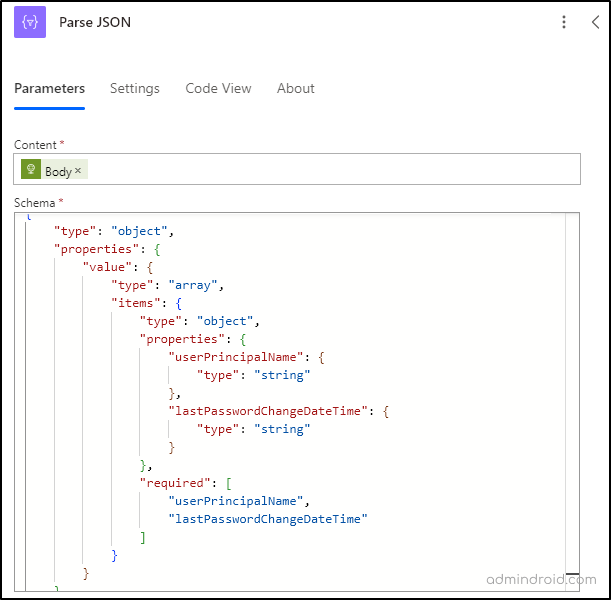
- In the ‘Schema’ field, copy and paste the code below.
{
    "type": "object",
     "properties": {
        "value": {
            "type": "array",
            "items": {
                "type": "object",
                "properties": {
                    "userPrincipalName": {
                        "type": "string"
                    },
                    "lastPasswordChangeDateTime": {
                        "type": "string"
                    }
                },
                "required": [
                    "userPrincipalName",
                    "lastPasswordChangeDateTime"
                ]
            }
        }
    }
}
The schema defines the structure of the JSON data you expect to receive. It acts as a blueprint that tells the automation tool how to parse and understand the JSON data. This schema ensures that the value property is an array of objects, where each object must contain a userPrincipalName and lastPasswordChangeDateTime, both as strings. This is used to process lists of users and their associated metadata, such as password change dates, within the workflow.
Step 5: Add Condition to Check Password Expiration
Now that we’ve processed the data, our next step is to verify the expiration dates for each user’s password. Proceed with the following steps for evaluation.
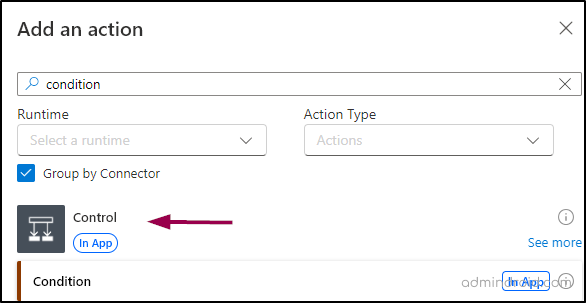
- The next action should be ‘Condition’. This checks if the password expiration date is within the next 7 days for each user. Search for Condition and select it.
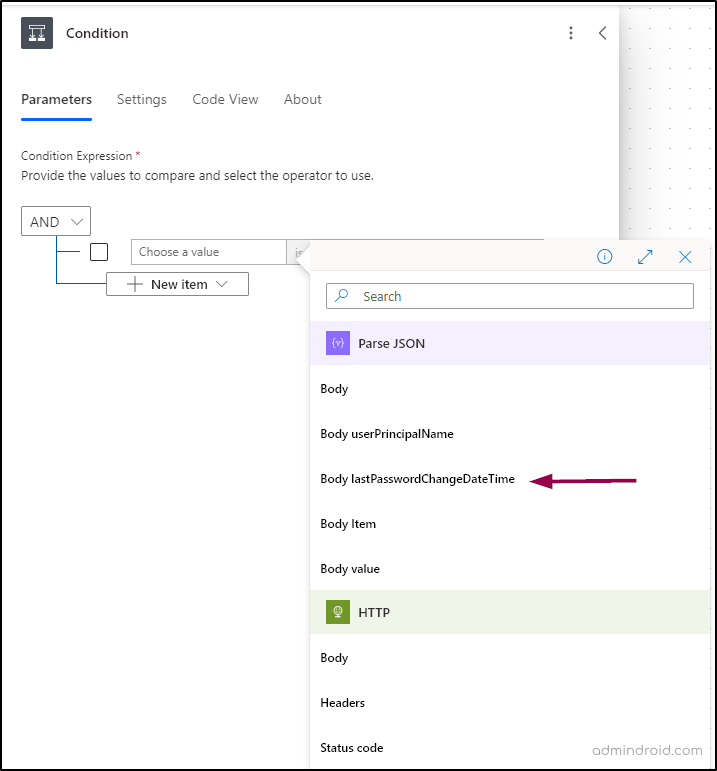
- In the ‘Choose a value’ field, click on the dynamic content icon and select Body LastPasswordChangeDateandTime.
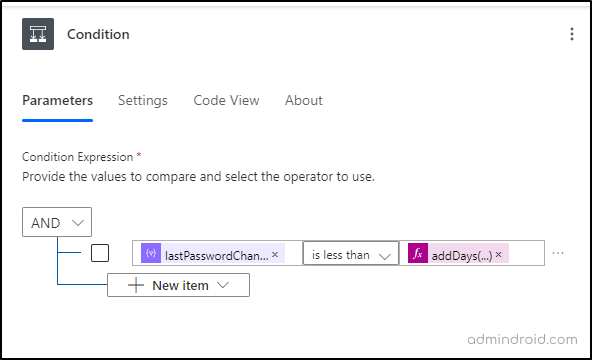
- In the second field, select “is less than”.
- In the third field, enter this value “addDays(utcNow(), 80)”.
Step 6: Send Password Expiration Notification Email:
So far, the workflow identifies users whose passwords are scheduled to expire in 7 days. Next, we’ll configure it to automatically send reminder emails to prompt these users to reset their passwords.
Note: If a user updates their password during this 7-day period, the workflow will stop sending reminders until their next password expiration date approaches.
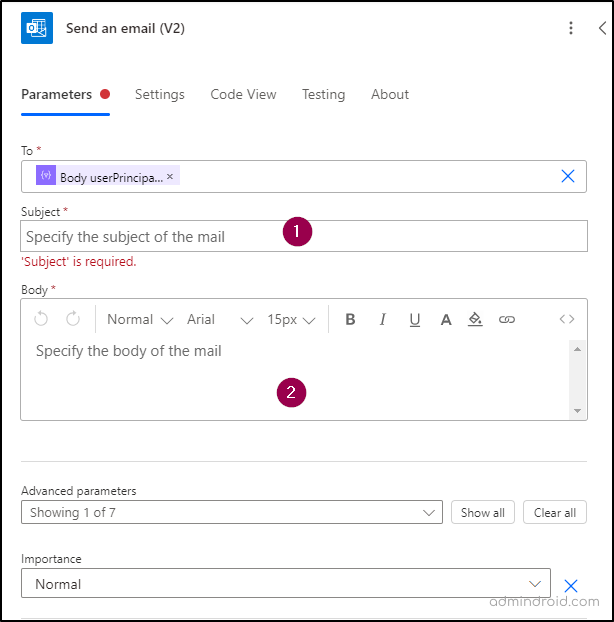
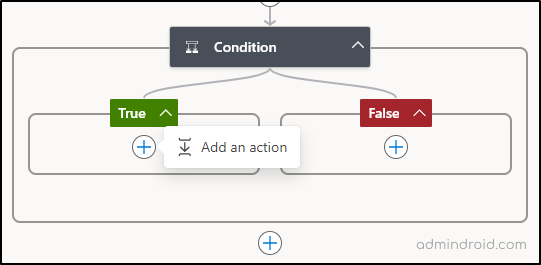
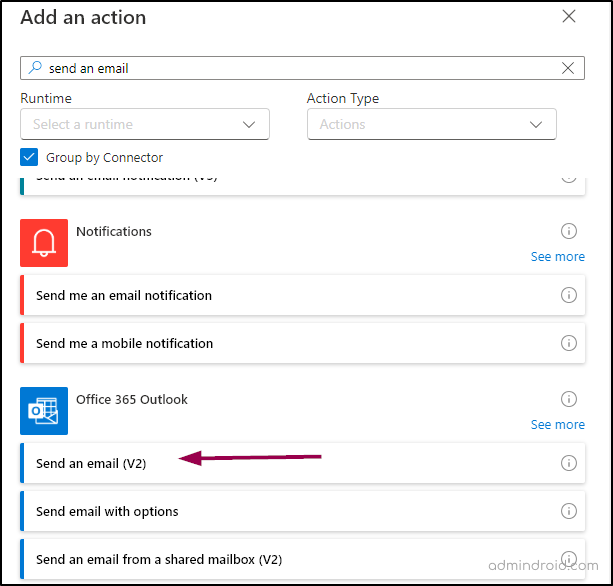
- Click on the + inside the True condition -> Add an action.
- Search for Send an email(V2) under Office 365 Outlook.
- In the ‘To’ field, select ‘Enter custom value’, click on the dynamic content icon & select Body userPrincipalName.
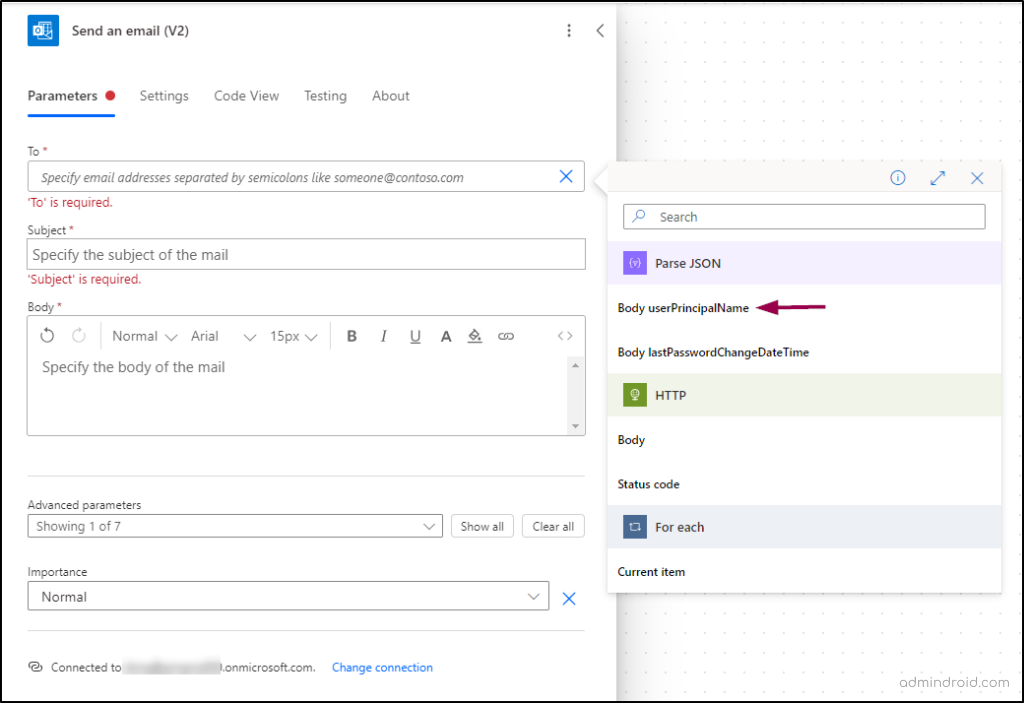
In the ‘Subject’ field, enter your subject – something like,
“Your password will expire in …. days”.
- In the ‘Body‘ field, enter the message – something like,
“This is a reminder that your password will expire in 1 day. Please change your password to ensure uninterrupted access to your account”. Don’t wait until the last minute! Click here to reset your password now”.
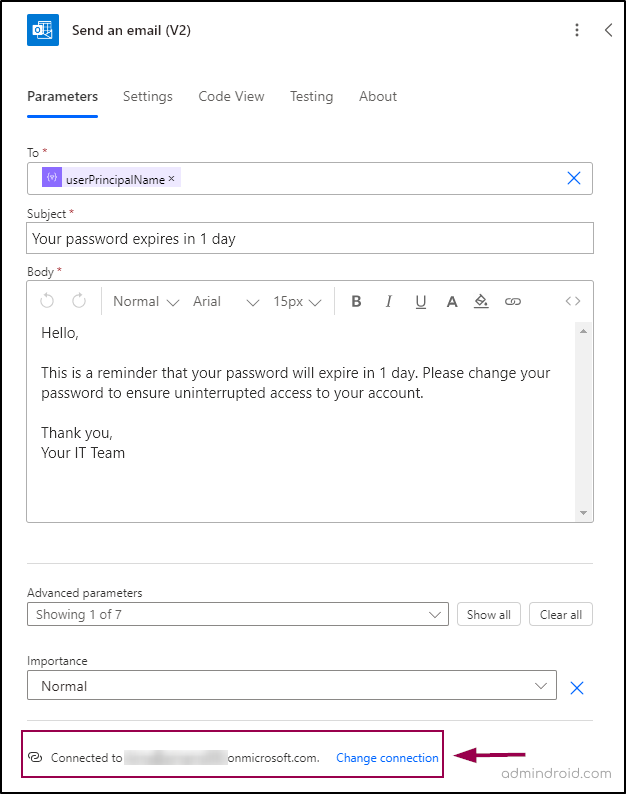
- In the ‘Change connection’, you can add the email address from which the emails should be sent to users.
Step 7: Save the Flow
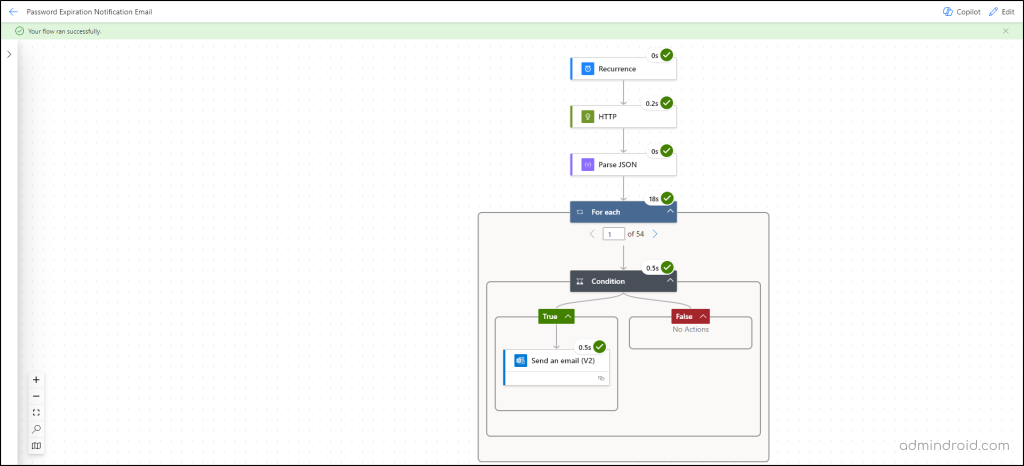
Save your flow. Now your flow is ready to go and should look like the screenshot below.
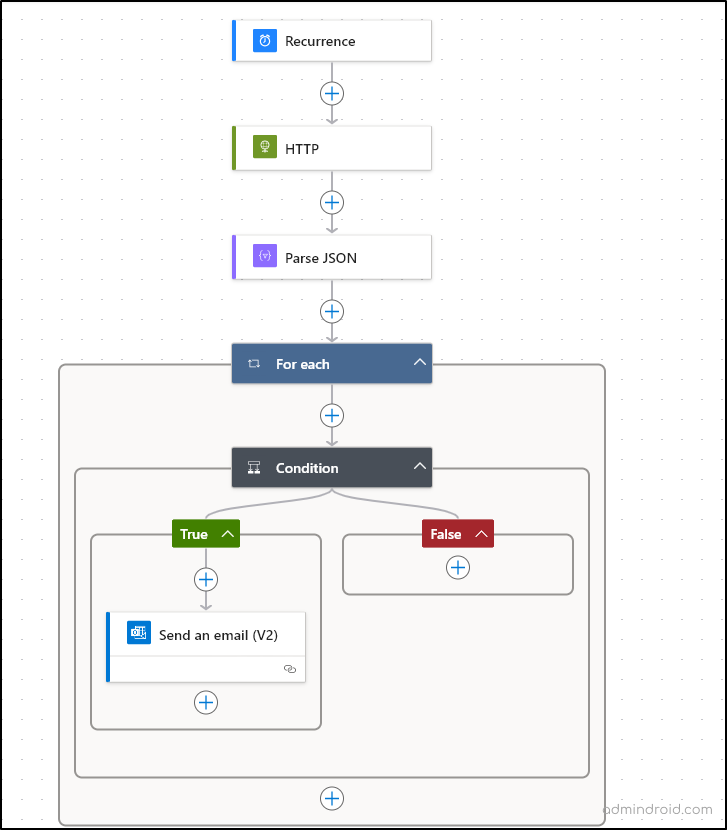
Flow Elements Breakdown:
- Recurrence: This trigger initiates the flow on a scheduled basis (e.g., daily, weekly).
- HTTP: Performs an HTTP request to get data from Microsoft Graph API.
- Parse JSON: Parses the JSON response from the HTTP request to make the data usable in subsequent steps.
- For each: Nested action that iterates over items within each iteration of the outer loop (likely a nested array).
- Condition: Checks a condition within each iteration.
- True: If the condition is met, sends an email using the “Send an email (V2)” action.
- False: If the condition is not met, no action is specified in the False branch.
Testing the Password Expiration Notification Flow:
- After saving it, click ‘Test’ on the toolbar.
- In the Test Flow flyout page that appears, select ‘Manually’.
- Click on Test -> Run flow -> Done.
By this time, the users will start getting email notifications as per the flow.
User Experience:
The user will receive the email to their inbox as shown here.
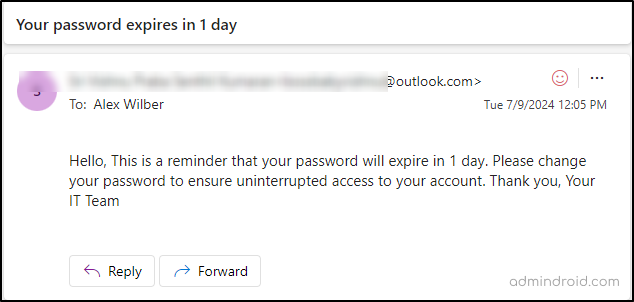
This confirms your Power Automate flow is perfectly set up and running flawlessly.
We hope that this blog has given you detailed instructions to send password expiry notification emails in Microsoft 365. For those who have passwords set to never expire, consider strengthening your account security with options like passwordless authentication, Microsoft 365 passkeys, Microsoft Defender alerts, etc based on your requirements. Thanks for reading. For further queries, reach out to us in the comments section.
The post Send M365 Password Expiration Notification via Power Automate first appeared on AdminDroid Blog.